Showing posts with label Teaching and Learning. Show all posts

Wednesday, February 1, 2023

Canvas Preview Tip: Using Rubrics with Canvas Discussions

Contributed by Henry Newkirk, Instructional Designer II (HSH)

What is a rubric? A Canvas rubric is an assessment tool used in the learning management system (LMS) Canvas. It allows teachers to create a set of criteria for evaluating student work and assign point values to those criteria. The rubric is then used as a guide for grading and provides a clear and consistent framework for evaluating student performance. The points are summed up to arrive at a total score, which provides a quantitative measure of the student's performance on a particular assignment or project.

Why would I use a rubric? Instructors use Canvas rubrics for several reasons:
  • Clarity and consistency: A well-designed rubric provides a clear and concise set of criteria for evaluating student work, making it easier for instructors to grade assignments and provide constructive feedback.
  • Improved communication: A Canvas rubric helps instructors communicate their expectations to students, reducing the likelihood of confusion or misunderstandings.
  • Objectivity: Using a rubric helps instructors to grade assignments objectively, reducing the influence of personal biases and ensuring that all students are evaluated according to the same standards.
  • Increased efficiency: Grading with a rubric can be faster and more efficient than grading without one. It eliminates the need for instructors to create grading criteria from scratch for each assignment, allowing them to simply refer to the rubric for guidance.
  • Student engagement: Providing students with a copy of the rubric before an assignment is due can help to improve their understanding of the assignment requirements and increase their engagement in the learning process.
For our Canvas “early birds” and “early adopters,” the following steps outline how you can add a rubric to a graded discussion in Canvas. To access these steps accompanied by screen captures, please visit our blog post of this article.

Start by clicking the Discussion link in the Canvas course menu and then click on the discussion name to which you want to add a rubric.
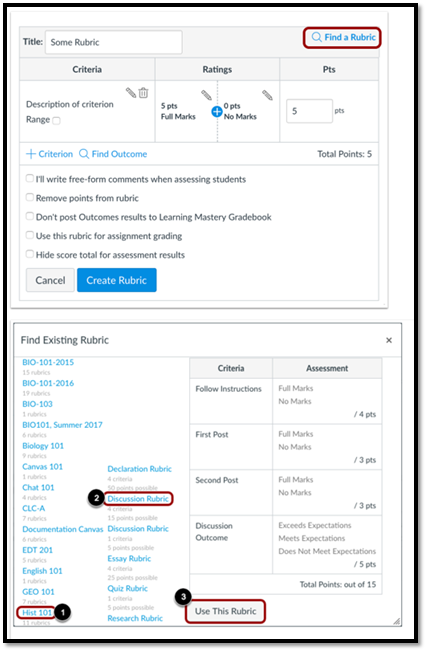
 The default screen after Add a Rubric prompts you to create a new one from scratch. To do so, you will enter a title for the rubric, create the rubric criteria, ratings, and points, choose your options, and click the Create Rubric button.


You can also use an existing rubric. To find an existing rubric, click the Find a Rubric link. You can find rubrics that were created in previous graded discussions as well as rubrics created in other courses where you have an instructor role. To find an existing rubric you will first need to select the course from the left column. In the second column, locate and click the name of a rubric. You can view the criteria and points in each rubric and set rubric options. To select a rubric for the graded discussion, scroll to the bottom of the rubric and click the Use This Rubric button.
For both new rubrics and using existing rubrics, the options include the following:
  • Option 1: Write free-form comments to students in SpeedGrader. With using this option, no ratings are used to assess the student, and criterion values are assigned manually.
  • Option 2: Removal of points from the rubric. You use this option to remove points from the rubric. Students can still be rated using the rubric criterion.
  • Option 3: Don’t Post to the Grade Book. Students can see rubric and outcome results in the grades and submission details pages, but results will not be posted to the Learning Mastery Gradebook.
  • Option 4: Use the Rubric for Grading. Use the SpeedGrader with the rubric to grade assignments.
  • Option 5: If you don't want students to see the score total for the rubric, select the Hide score total for assessment results. Students can still see the point values for each criterion, but the total score will not be shown at the bottom of the rubric. This option is only available if the rubric is not used for grading and only applies to students when they view rubrics from the Grades page.
In the coming months, we will explore tools in Canvas that support teaching and learning in greater detail. For more information, check out the Canvas Basic Guide by Instructure. In the meantime, if you have any Canvas-related questions, please contact OIT's Support Center. Our Support Center colleagues will create a help ticket for your request, and it will be assigned to the most appropriate member of the IDT team.

Thursday, January 26, 2023

AI Tools and Their Effect on Higher Education, Part 3

Contributed by Izaak Diefenbach, Instructional Designer I (COE)

This is the third article in my series on the use of artificial intelligence (AI) tools in higher education. In the first article, I used an AI tool called GPT-3 to write the introduction to the article, then went on to discuss it and other similar AI tools and how their use could affect higher education. In this article, I am going to discuss one specific new tool, ChatGPT.

You may have already heard about ChatGPT. It has been all over the news since its introduction in late November. ChatGPT is a chatbot built on top of GPT-3’s language models. It has since been updated and improved with the release of GPT-3.5. I know this is a lot of technobabble, so what is it really? ChatGPT allows a user to ask questions and receive answers using natural language. Basically, this means that you can type in a question in regular, non-technical language and you will get back a response that reads like something a person would write, not a computer. It is designed to be used in areas such as customer service and technical support, where it is important to be able to provide quick and easy access to information. It can also be used in education for tutoring or research assistance, for example.

However, ChatGPT is capable of a lot more than those kinds of simple interactions. It can write poetry and song lyrics. It can write screenplays and other kinds of stories. It can even write music. It is really amazing to think about what it is capable of. But it can also be used to write essays and answer test questions, and this is why it is making the news.

One of the first questions many people ask is whether or not the answers are actually any good. The answer is yes and no. It frequently depends on what you are asking it to do. Sometimes the responses are very good; other times, they can be really bad. The important thing to note is that it is constantly being improved, and it is getting better at an astonishing rate. In education, the question most have is, “isn’t this cheating?” Maybe or maybe not. That depends on the instructor.

For now, the general reaction seems to be, yes, this is cheating. That is a natural response to new technology. It has always been like this. When I was in high school, that was the reaction from math teachers to scientific and graphing calculators. But the reality is that this technology is not going anywhere, and it will only get better, so we need to embrace it, understand it, and learn how to use it to enhance instruction.

If you are interested in trying out ChatGPT, you can find it here: https://chat.openai.com/. If you are interested in learning more about AI tools in higher education, we will be doing an online presentation during Faculty Development Week on February 6th at 11:00 AM. Be on the lookout for more details soon.

Wednesday, October 26, 2022

Canvas Post-Announcement News (Part 2)

NOTE: The following information is also available in the IDT team's full Canvas Post-Announcement Newsletter in Sway.

Our Transition Plan

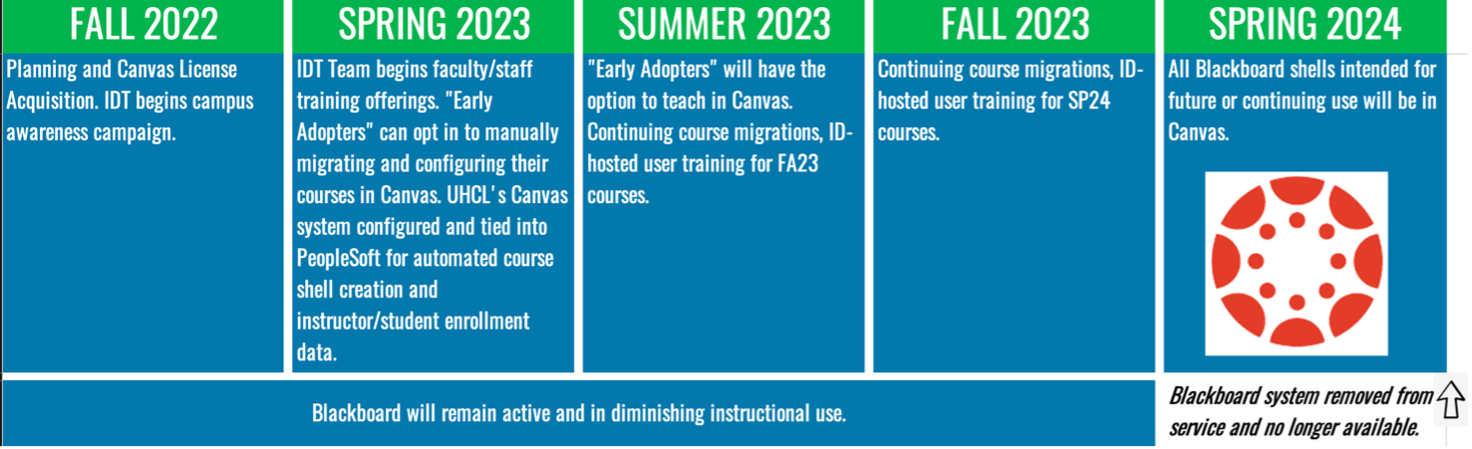
UHCL is in the very early stages of transitioning from Blackboard to Canvas. University Technology Advisory Committee (UTAC) reviewed a tentative plan in October 2022. Below is the high-level visual timeline for the UHCL transition plan. We expect to complete our transition by the end of Spring 2024.


The following additional resources outline UHCL’s tentative transition timeline and plan:
When Can I Start Using Canvas?

Instructors cannot yet teach their UHCL classes in Canvas. However, there are several opportunities for faculty to get practice in using Canvas:
  • Volunteer to be an "early adopter" or "Canvas champion." Complete and submit the online Canvas Pilot Program form for more information or to volunteer.
  • Review the IDT team's document for Canvas "early birds" to complete the following:
    • Sign up for a free Canvas account and begin learning Canvas and preparing your Blackboard courses for migration in Instructure's "public" Canvas system. NOTE: Instructors must not teach their UHCL classes from this public system. Think of it as a "sandbox" space to familiarize yourself with the new LMS, import into and edit your existing Blackboard course content in Canvas, or practice building a new course "from scratch" in the new environment.
    • Complete the Introducing Canvas course available on UHCL's LinkedIn Learning system. NOTE: We recommend that you obtain a free Canvas account and create a blank shell on their public system in which you can practice as you advance through the two-hour training.
  • Make plans to participate in the Instructional Design and Technology (IDT) team's upcoming informational and initial Canvas familiarization sessions beginning in November 2022.
“Early Adopters” and Canvas “Champions”

We recognize that UHCL faculty and staff may already have experience with, expertise in, or are simply eager to learn the Canvas LMS. Faculty have the option of volunteering to be a Canvas "early adopter," Canvas "champion," or both via our team's Canvas Pilot Program online request form.
  • "Early Adopter:" faculty member who would like to prepare their course(s) and deliver them in Canvas before the SP24 full deployment semester. Early adopters may opt to first teach in Canvas in either the SU23 or FA23 semesters.
  • Canvas "Champion:" faculty member with previous Canvas experience willing to support other instructors throughout the Canvas transition, provide regular feedback via the UTAC, and participate in Canvas informational and professional development sessions.
OIT's Instructional Design and Technology team looks forward to collaborating with all early adopters and Canvas champions throughout this exciting transition!

What Options Exist for Training/Support?

OIT's Instructional Design and Technology (IDT) team is planning a robust schedule of informational and training opportunities that will begin in late October or early November 2022. Visit the IDT team's new Canvas Faculty Support webpage for the latest resources.

This "special edition" of the IDT weekly newsletter is the first of many electronic communications to the campus to keep everyone informed over the next 18 months. Our weekly newsletter will be the primary means of electronic communication. To continue receiving those newsletters, please email IDT@uhcl.edu to opt into the newsletter mailing list. Less frequent electronic communication may originate as emails from either IDT@uhcl.edu or SupportCenter@uhcl.edu, so please keep an eye out for emails from those addresses, especially if they reference Canvas in the subject.

We invite faculty to use our "early bird" instructions document to familiarize themselves with Canvas while we finalize training and professional development opportunities. The document includes instructions for creating a free Canvas account and information about a LinkedIn Learning course that can get you acclimated to the new system.

What’s Next?

OIT is working with the University of Houston System (UHS) to secure a contract for a UHCL-specific Canvas environment. The IDT staff is continuing our documentation efforts and setting a schedule for professional development and informational sessions beginning in November 2022.

Faculty with questions currently are welcome to contact their college's University Technology Advisory Committee (UTAC) representative or contact the Support Center to request a consultation with a member of the IDT team.

Canvas Post-Announcement News (Part 1)

NOTE: The following information is also available in the IDT team's full Canvas Post-Announcement Newsletter in Sway.

Provost’s Message from the Academic Affairs Update 10-24 Email - 
Learning Management System (LMS) Update

The University Technology Advisory Committee (UTAC) has explored options for transitioning from Blackboard to Canvas. The process included a survey among faculty to determine the needs of the LMS as well as familiarity with Canvas. UTAC has unanimously approved a recommendation to transition to Canvas. The Provost has accepted their recommendation and will present a transition plan at the next Faculty Senate Meeting. Dr. Jana Willis, the chair of UTAC, will be one of the presenters at Faculty Assembly, and faculty are invited to ask questions about UTAC’s recommendation during the Assembly. There is much work to be done, but please join us in thanking UTAC for their hard work that led to this recommendation, as well as their work to assist in the planning of a smooth transition.

What is Canvas?

Canvas by Instructure (Canvas) is a learning management system (LMS) used to deliver 100% online courses and to support teaching and learning in face-to-face, web-support, hybrid/blended, and HyFlex courses. On Instructure's Community page, What is Canvas? they describe their product as follows:
Canvas is a web-based learning management system or LMS. It is used by learning institutions, educators, and students to access and manage online course learning materials and communicate about skill development and learning achievement.

Major Improvements Over Blackboard

Blackboard and Canvas share many similarities. Both are categorized as learning management systems and are suitable for use by medium and large entities, including colleges, universities, K-12 schools, and businesses. They share a number of tools and features, although how each LMS refers to those tools and how they function differently from one another. The University of Houston’s Instruction@UH office webpage, Blackboard-to-Canvas Tool Comparison, provides a nice overview of both platforms’ major features, a brief description of differences, and links to Canvas resources about their version of each feature.

Those who have never seen a Canvas course are invited to view the IDT team’s “crash course” video, Canvas "First Look" [6:07], in which we provide a brief visual comparison of the same course in both Blackboard Learn and Instructure Canvas.

Wednesday, October 19, 2022

Reminders About Available (and Possibly Misunderstood) Instructional Technologies and Capabilities

Contributed by Jenni Willis-Opalenik – Director, Technology Learning Services

Recently, the IDT team assisted the University Technology Advisory Committee (UTAC) in disseminating the university’s LMS Survey. In reviewing survey data, we saw some open-ended comments that suggest a need for more information about a few existing tools and capabilities of which some instructors are unaware.
  • Live video classroom capabilities…to have class online and in person at the same time. Two options are available to faculty from within Blackboard while teaching: (1) Zoom integration with Zoom to set up and conduct Zoom sessions that enable virtual students to “attend” your in-person class, and (2) Echo360’s lecture capture with live streaming.
  • A video assignment (recorded presentations) submission portal that reduces video size automatically. Students can use Echo360 Universal Capture: Personal to create video presentations and save them in their Echo360 Library. They can then submit their video as a hyperlink in a Blackboard assignment drop box, discussion, or another area in a course. Our team has created a short “crash course” video, Student Presentations Using Echo360, for students on all of these Echo360 topics.
  • I would like to see the data on student time spent within the course each day or week. Blackboard provides two options for faculty interested in student activity and performance data within a Blackboard course. For more information, you may want to review Blackboard’s support pages on Course Reports and the Retention Center.
  • Download the Blackboard exam into Microsoft Word. I’m not sure whether this request references downloading a blank copy of an exam to Word for in-person use, or whether the instructor wants to be able to download students’ completed online exams to Word for offline grading. If the request is in reference to the first option, the IDT team’s staff can assist you. Simply email the Support Center to request assistance and your inquiry will be routed to our team. An instructional designer or learning technology administrator will be assigned to use Respondus Exam 4.0 to extract your online exam from Blackboard into a Word exam and answer key. Regarding the second option, we do not have a solution for that request available at this time.
  • A product like Studio for video storage, and the capabilities to create video interactive quizzes. The university acquired Echo360 several years ago, and the IDT team continues to promote awareness of and provide training on that application for the following features: (1) video lecture/presentation recording, (2) storage for audio/video contents created in Echo360 or Zoom, or imported from another source, (3) modification of videos stored in Echo360 to include embedded questions for students to answer as they watch the video, and (4) accessing student viewing and response data. Please refer to the following IDT resources for more information on these features:Promoting Active Engagement with Within-Video Polls/Questions
  • I would like to be able to add comments on written work that students can access without my having to download and save a file that I have to post back…Even better would be the ability to offer spoken comments that are recorded by the system. Blackboard provides some degree support for both of these requests. For more information, you may want to review Blackboard’s support pages on Assignment Inline Grading and Record Audio and Video Feedback.
  • Creating tests in Blackboard is so painful that the thought of having to recreate the tests used in my lab classes is making me nauseous. Most were developed when the university had a license for Respondus 4.0, which greatly facilitated setting up automated tests, but since losing that option, the one or two quizzes I've had to create or modify have been tremendous time holes. UHCL still has Respondus Exam 4.0. However, when we needed to implement single sign-on (SSO) security protocols, making a connection between Respondus Exam 4.0 and Blackboard became problematic and frustrating. However, the IDT team regularly assists faculty with getting exam questions from a Word document into the Blackboard course(s) via Respondus. Simply email the Support Center and request that assistance. Your inquiry will be sent to the IDT team, and one of our Instructional Designers will be assigned to help you. For those faculty of a more “do it yourself” approach, we do have a DIY workaround that enables you to upload questions from a Word document into a Respondus exam, exporting/downloading the test from Respondus as a Blackboard-ready exam file, and importing that file into the Tests, Surveys, and Pools area in your Blackboard course. For more information about the workaround, please review the IDT team’s “crash course” video, Respondus Exam – Manual Workaround [5:49].
In addition to the specific resources referenced above, the IDT team encourages you to contact the Support Center to request more information about these features, or about anything related to instructional design and instructional technologies. You may do so by email at SupportCenter@uhcl.edu or by telephone at (281) 283-2828.

Respondus LockDown Browser Information

Contributed by Sam Houston, Learning Technology Administrator

Faculty: For information on Respondus LockDown Browser, please click “Faculty Information” on our Online Proctoring Resources page. Under “Respondus LockDown Browser and Monitor” you will find links for various help sources including how to configure a Blackboard test to use LockDown Browser and a quick start guide for Respondus LockDown Browser and Respondus Monitor. Note: When directing your students to information about Respondus LockDown Browser and Monitor, please remind them to visit the IDT team's web page, Online Proctoring Resources -- NOT to our team's Respondus web page. As noted in bold at the top of our Respondus page, it "is not the page for information about RESPONDUS LockDown Browser. For help with LockDown Browser, please refer to our Online Proctoring Resources page."

Students: In order to take exams and review results, students will need to download and install the UHCL-specific Respondus LockDown Browser. Students can find tutorials, the download link, quick start guide, and test-taking tips for Respondus by clicking “Student information” on our Online Proctoring Resources page.

An important note: If an exam is set up to use Respondus LockDown Browser, after taking the exam, students will need to log into Blackboard using the Respondus LockDown Browser to retrieve their grades and exam feedback. If they use any other browser to log into Blackboard and access their exam results, they will receive this message: “You cannot review the assessment results without using Respondus LockDown Browser. Start Respondus LockDown Browser and navigate back to this point to continue.”

If you have any questions about the above information, please feel free to contact the Support Center at either 281-283-2828 or supportcenter@uhcl.edu, and a member of our team will be in touch to assist!

Student Engagement in Hybrid Learning: Part 2

Contributed by Jane Nguyen, Instructional Designer I (CSE)

A couple weeks ago, I wrote an article giving two tips on student engagement in hybrid mode (This means students meet in person sometimes; other times they are engaging with the material from a distance through a learning management system [LMS], like Blackboard). The article also covered how to bridge an activity started in an in-person session to the LMS so that there is cohesion and fluidity.

I want to continue discussing student engagement this week. It’s an especially important topic to me because I've spent my entire teaching career trying to improve it, as have other instructors.

It tends to be the case that we know our material very well, and the subject matter is indeed interesting, and relevant in ways many students don’t realize. But that is still separate from whether we can deliver it in a way that is engaging for students. This is the challenge. Infusing active-learning tasks has the potential to get students to see the material as, at best, very engrossing, and at least, not terribly boring.

All it takes, in my view, is the old adage of making learning fun. At the root of “making learning fun” is the concept of “play.” Of course, “play” for young adult and adult learners doesn’t look like play for kids, but it’s true that adult learners appreciate adult versions of play, which includes engaging with classmates, experiencing new concepts in connection with things they like and love outside of school, and lastly, hands-on “tinkering.”

I made this infographic to give you some ideas on how to engage students in the classroom and to then connect it to the LMS (learning management system) to continue that engagement. The first two items are the tips I touched on two weeks ago. The others are new. Take a chance and try them, as you see fit. Your students may be taken aback at first by the creative spin, but they will appreciate your livening things up.

If you would like to download and print this infographic, please use the following hyperlink to download the shareable PDF document: Student Engagement Hybrid Learning. NOTE: You may be prompted to enter your UHCL account credentials to open this file from OneDrive.

Adding Library Research Guides to Blackboard

The Neumann Library at UHCL maintains an extensive catalog of subject- and course-specific Research Guides. Each Research Guide has been created by UHCL librarians to help students find, learn about, and use scholarly information resources and services. Each guide’s Home tab provides links to databases that are specifically relevant to the subject area or course for which the guide was developed. The page also provides quick email links that students can use to contact specific research librarians for more assistance.

Other tabs on the research guide provide students with easy access to general resources, tips for effective research and academic writing, and information about other library services. If your course requires students to research and write, the use of a research guide may be a valuable resource for you and your students. It’s a fairly simple process to locate a research guide and then place a link to that guide into your Blackboard course. UCT’s Course Development & Support Team, in collaboration with the Neumann Library, has developed a handout that demonstrates how to locate a research guide on the library’s web site, copy its web address (or URL), and use the URL to provide a quick link in your Blackboard course that will take students directly to the research guide. The PDF document, Adding ResearchGuides to Blackboard, is available on the library’s Linking to Library Resources web page.

Wednesday, October 12, 2022

EDUCAUSE 2022 Students and Technology Report: Rebalancing the Student Experience

Contributed by Izaak Diefenbach, Instructional Designer I (COE)

This week, I would like to draw your attention to the 2022 Students and Technology Report from EDUCAUSE. Entitled “Rebalancing the Student Experience,” the report presents the results of a national survey of 820 undergraduate students in the USA. Much like the renewed focus on work/life balance among American workers, students want the same from higher education. The report presents its findings in four key areas:
  • Technology Challenges and Solutions
  • Modality Preferences
  • Access to Educational Technology
  • Student Success
The Technology Challenges and Solutions section reports some interesting findings. 51% of students report that unreliable technology causes them stress. 77% of students report experiencing at least one technology issue in the past year. Unstable internet is the most common issue, reported by 66% of students, with 29% reporting having lost internet connectivity during online synchronous sessions. When it comes to resolving technology challenges, many students report trying to fix them on their own or asking friends and family to help them.

The Modality Preferences section reports data that is not a surprise to those of us in instructional technology. Since the pandemic, student preference for online course options is increasing. In 2020 (pre-pandemic), 35% of students reported a preference for completely face-to-face courses, compared to 29% in this year’s report. In contrast, in 2020, 5% of students reported a preference for completely online courses, compared to 20% this year. Percentages for mostly face-to-face and mostly online courses show similar results.

The Access to Technology section of the report echoes previous research in that most students have the devices they need for school, and that they own and have access to their devices whenever they need them. The majority of students (86%) also report using a laptop or desktop computer as their primary device. While most students (62%) report that their choice of device was based on personal preference, only 52% of those with a reported disability and 44% with pandemic-related housing issues reported basing their decision on personal preference.

The final section of the report, Student Success, also echoes previous research, with 30% of students reporting that completing their degree was the greatest measure of success for higher education. The other 70% is divided among such indicators as securing a job, achieving personal growth, and securing a high salary. The report also investigated how students felt supported by their institutions as well as how they felt the institutions did not support them. Among the ways students felt supported are academic support, career services, online courses, and extracurricular activities. Among the ways students felt institutions did not help are financial aid, inadequate access to technology, inadequate disability accommodations, and insufficient availability of courses.

The report concludes with several recommendations for institutional leaders. These include investigating how technology is supporting and causing stress for students, discontinuing support initiatives that are not being used and developing new ones, and engaging faculty and staff to disrupt the “face-to-face versus online” dichotomy. The entire report is available here: 2022 Students and Technology Report from EDUCAUSE. I recommend reading the full report. It is an interesting read.


Citation for the report:

Jenay Robert. 2022 Students and Technology Report: Rebalancing the Student Experience. Research report. Boulder, CO: EDUCAUSE, September 2022.

Wednesday, October 5, 2022

Resources and Professional Development Recommendations

Contributed by Jenni Willis-Opalenik, Director - Technology Learning Services

Are you looking for some new information to support your web-supported, hybrid, or online teaching? If so, we suggest that you may find one or more of the following of value:

Recommended LinkedIn Learning Courses

As stated on UHCL’s Human Resources web page, “UHCL faculty and staff have free access to LinkedIn Learning.” Access LinkedIn Learning to review their “online library of instructional videos and content that will help you strengthen your skills in technology, business, creative design, and much more,” including the following:
  • Teaching with Technology (2 hours 30 minutes) - Kevin Kelly
  • Learning How to Increase Learner Engagement (41 minutes) - Karl Kapp
  • Gamification of Learning (2 hours, 16 minutes) - Karl Kapp
New EDUCAUSE Articles

Martin, F. & Kui, X. (2022 Sept 27). Digital Transformation in Higher Education: 7 Areas for Enhancing Digital Learning. Retrieved from https://er.educause.edu/articles/2022/9/digital-transformation-in-higher-education-7-areas-for-enhancing-digital-learning

Abstract: This article reflects on current practices and directions for digital transformation through a framework that supports the strategic responses and structural changes that higher education institutions could implement to enhance digital teaching and learning.

Thanaraj, A., Durston, P., Chathangoth, A., & Sumpter, J. (2022 Jul 29). The Digital Learning Design Framework and Toolkit: Transforming Course Design. Retrieved from https://er.educause.edu/articles/2022/7/the-digital-learning-design-framework-and-toolkit-transforming-course-design

Abstract: Teesside University and Jisc UK have developed a Digital Learning Design Framework and Toolkit. The framework and toolkit were created to help nurture and cultivate the digital confidence and fluencies of teaching staff who design and deliver courses, challenging them to think about learning design and the intersection of pedagogy and digital solutions to map the student learning journey. This collaborative effort combines national and international perspectives on digital learning design. The toolkit contains seven sections and is intended to be used by course leaders and course design event facilitators to inform their course designs.

Downloadable the Toolkit PDF at https://library.educause.edu/-/media/files/library/2022/7/digitallearningdesignframeworkandtoolkit.pptx

Learning Management System (LMS) Survey

In a recent accessibility review at the University of Houston, Bb Learn, as a Learning Management System (LMS), did not meet the state and federal requirements. Consequently, UHS (UH, UHV, and UHD) decided to move to a new LMS to meet accessibility requirements.

The University Technology Advisory Committee (UTAC) is gathering faculty input to select our new LMS, an implementation timeline, and needed resources for the transition.

Please contribute your input on this process by completing the UHCL LMS Survey using the link below.

UHCL Learning Management System (LMS) Survey

General Tips for Hybrid Teaching: Part 1

Contributed by Jane Nguyen – Instructional Designer I (COE)

Some of you may be aware that in addition to being an instructional designer here at UHCL, I am also a long-time college instructor who has, for years, taught both in-person and online. Currently, it’s an in-person Saturday class at Houston Community College. Even with the “in-person” designation, however, our heavy use of a learning management system (LMS) when not in class makes it effectively hybrid as well.

So, this week I’d like to riff on hybrid teaching. This will necessarily mean tips on engaging students in the classroom, engaging them online, and how to bridge the two for hybrid cohesiveness. To make this clear and easy, I’ll organize this by mode and give two tips per mode (a small # since I tend to elaborate).

Classroom Teaching Tips

Pair Share – The potential for good class discussions is always the first thing I think of when I’m assigned an in-person class – how my class and I will engage in a lively intellectual conversation where people share intelligent perspectives along with relevant personal experiences. Unfortunately, this doesn’t happen easily at all. Too often, students behave as if they have nothing to say even when given an interesting topic.

I find that…they do have something to say; they are often just disinclined to share it with the whole class (too much potential for embarrassment). I overheard another educator this week talking about the very same issue—students clamming up if they’re asked a question as a whole, but gabbing away the moment they’re put in a group of three to discuss or with just another partner.

So…do that. “Pair Share” is a good practice regardless of your content. You might think…but my content isn’t the type of content that students can or will discuss. First of all, you’d be surprised at what students can come up with even about factual, non-controversial, or what seems like “dry” topics. And two, talking to one’s neighbor (classmate sitting n isn’t always about hashing out a controversial issue or giving an opinion. Letting students summarize or explain a concept you just talked about helps them learn it and helps it crystallize in their working and long-term memory. It also gives them a chance to clarify information to each other, which they will do, and even if they don’t say so, the act of articulating and demystifying concepts through speaking out loud will feel satisfying to them.

I encourage you to do this even if you are lecturing. Find breakpoints within a 45-minute lecture to let students pair-share. These pair-shares (can be three students if you prefer) are typically followed by asking if any group or pair wants to share with the whole class (either their opinion or a point of confusion). It is often the case that they will at this point since now they feel more validated in their thoughts or confusion and are willing to take them public.

How to bridge to online mode on the LMS?

Consider latching onto an interesting point that was made in person and creating a discussion board prompt in Blackboard related to it, beginning it with “In class on Thursday, Parker made the astute observation that…” and then posing the new question.

You can also latch onto an interesting resource or idea a student brought up, and post links related to the student’s mention. (A couple Saturdays ago, a student of mine mentioned a book relevant to what we were discussing in class. The next day, I posted a link to the book on Amazon as well as a YouTube video/TED talk of a person talking about the book, and I mentioned the student who talked about it in class). When you do this consistently, you’re not only bridging the in-person realm and the online realm, you’re showing students that you’re thinking of them and the ways you want them to be enriched. The class also feels more personal because there isn’t just a fixed set of resources put in place at the beginning of the semester that every semester’s iteration of that class gets, but also intermittent personalization to their specific ideas, thoughts, and interests in that semester’s unique version of the class.

Play Music

This tip will be shorter because it’s a little more whimsical. But…I want to share that a couple Saturdays ago while I was waiting for class to fill up, I had YouTube up on my projector screen and the classroom sound on and allowed a few popular easy-listening songs to play while we were idle before class started. This was at a low/moderate volume but loud enough for us to listen and enjoy. Several of my students loved it. One said, with a peaceful look on her face, “I like this…this is nice.” Another said, bright-eyed, “I like this song. This is one of my favorites.” I said, “I was just trying to wake us up.” She said with a smile, “You did.”

Of course, I did not play music once we got started (although there are pedagogical approaches for the appropriate use of music during class too, especially when it’s related to your subject matter). But I think many educators could use a reminder that school environments should not be austere all the time. School is a place to learn, but that can happen in a relaxed, easygoing, friendly atmosphere while still being serious about learning. Not to mention…your students like to see the human side of you - the side that likes some of the same things they like.

How to bridge to online on the LMS?

Well, as I said, don’t be afraid to share school-appropriate elements of pop culture and entertainment that you enjoy and that might help relax your students and give them a sense of your class and college as serious but also fun, connected to real-life, pop culture, recreation, and niche interests, etc. Of course, as with everything, don’t go overboard!

This week, I gave two classroom teaching tips and bridged them to the LMS (Blackboard or Canvas). In my next installment, I’ll give two tips on components of your class that start online but are then taken to the in-person realm. Until then, here is a good resource from Cornell University about hybrid teaching.

Wednesday, September 28, 2022

Maximize Engagement with Articulate Rise 360

Contributed by Jenni Willis-Opalenik, Director - Technology Learning Services

Although UHCL doesn’t have a campus-wide license for Articulate 360, the members of our IDT team have the software and are ready to support faculty and staff with designing and developing interactive lessons and tutorials for use within and outside Blackboard Learn.

What is Articulate 360?

Articulate 360 is a suite of software applications that can be used to create and deploy media-rich and interactive instructional content. The two primary Articulate apps are Rise (a great option for creating simple projects or for learning basic Articulate knowledge and skills) and Storyline (a much more robust and slightly more complicated tool, best for creating complex lessons and interactive elements). For this article, we’ll focus on Rise 360, which Articulate describes as “the fastest and easiest way to create fully responsive courses for any device.”

Rise 360 Sample Courses/Demonstrations

To better understand Rise 360’s capabilities and begin thinking about how you might leverage it to support your teaching, we recommend the following resources:
As shown is these sample lessons and courses, Rise 360 enables you to combine video, audio, text, images, and interactive exercises to create engaging and creative instruction. Once you’ve had time to review these samples, and assuming they prompt you to consider how Rise 360 lessons might support your teaching, contact the IDT team for a consultation. The quickest way to reach us is by contacting OIT’s Support Center and requesting assistance from OIT’s Instructional Design and Technology (IDT) team. Our Support Center colleagues will create a help ticket for your inquiry and pass it on, where it will be assigned to the most appropriate member of the IDT staff.

Bb Ally: Adding a Layer of Accessibility to Online Learning

Contributed by Henry Newkirk, Instructional Designer II (HSH)

Ally is a Blackboard integrated tool that helps makes course materials accessible to all students regardless of differences in vision or hearing, specific learning disabilities, or learning preferences. Leveraging the Ally tool in Blackboard helps address students' diverse needs online. Ally provides equitable access to online course materials, not just for accessibility accommodations.


Ally Alternative Formats

Ally creates alternative formats of instructors' course content based on the original. Instructors do not need to do anything to provide these options to students. The user gains access to the automatically created alternative formats via the Ally link that appears next to content items in Blackboard courses. For a complete description of the formats, go to the Blackboard Ally Alternate Format page.

Accessibility Score Indicators

Ally measures the accessibility of each file attached to a course and shows the instructor at a glance how it scores (these scores are not visible to students). Scores range from Low to Perfect. The higher the score, the fewer the issues. For files with Low to High scores, Ally provides the instructor with information about the problems and step-by-step guidance on fixing them. To get the course report from the Add Menu Item on the Course Menu, click Tool Links and select from the (Type row) drop-down menu Accessibility Report. Once you choose it, you must type in a name for the link; you do not have to make the link available to users. Click the Submit button, and the link will appear on the Course Menu.

Course Accessibility Report


The course accessibility report acts as a complement to the existing accessibility indicators. It provides an accessibility summary and overview at the course level.
The report shows instructors this helpful information:
  • Accessibility score for the course
  • Distribution of course content by content type
  • List of all issues identified in the course
The Remaining issues section of the report allows the instructor to address each issue.


Watch the two brief videos, Introduction to Ally and an Overview for Faculty, to learn more about Ally. As always, you are welcome to request a consultation with an Instructional Design and Technology (IDT) team member to learn more about Blackboard Ally or any other instructional design/technology topics. To request personalized assistance, don't hesitate to contact OIT's Support Center at 281-283-2828 or supportcenter@uhcl.edu.

Blackboard Puzzler: How Can I Check on My Student Groups?

Contributed by Jenni Willis-Opalenik, Director, Technology Learning Services

It’s quite common for the IDT team to field inquiries from instructors who would like to see what’s going on in their individual Blackboard groups. When in Instructor mode, you simply can’t see or experience the groups as your students do. However, you can do so when in Student Preview mode…with a bit of planning and preparation.

Begin by entering Student Preview mode using the Enter Student Preview icon in the upper right of your Blackboard screen.


Activating and Saving Your Student Preview User

Once in Student Preview mode, complete as a student any Syllabus Quiz, Academic Honesty Quiz, or other tasks if you use such assignments to adaptively release contents. Next, click the Settings button for Student Preview (1). In the Student Preview Settings box, select the option to “Keep the preview user and all data (2).” Then, click the Save button (3). With those steps complete, click the Exit Preview button (4) to return to Instructor mode.


You have now created and saved a new student user, Username_PreviewUser, in the course. You can even see them in the Grade Center. You’ll next add that student user to all of your student Groups.

Adding PreviewUser to Groups

Navigate to where you have the Groups tool deployed for students. If you can’t locate it, that’s OK. Go to your lower Course Management menu, expand the Users and Groups label, and then click the Groups option.


Locate a group to which you want to add your PreviewUser. Click the edit icon to the right of the group name. Then select the Edit Group option from the menu.


Once on the resulting Edit Group screen, scroll all the way down to the Membership region of the page. Then, click the Add Users button.


At the Add Users screen, check the box to the left of your PreviewUser name. Then click the Submit button.


You’ll be returned to the previous screen’s Membership area, where you can confirm that your PreviewUser has been added. Click the Submit button to proceed.


Repeat the steps above to add your PreviewUser to other groups.

Accessing a Group as PreviewUser

To enter a Group space as your “student” PreviewUser, use the Enter Student Preview icon in the upper right of your Blackboard screen.


Next, locate and click the Groups link you’ve provided to your students to let them access their Groups. At the Groups screen, click the name of a group to access it.


Once on the Group’s page, you can access all of the areas and tools (e.g., Discussions, File Sharing) that you provided students when you originally created the groups. For most instructors, they want to see whether discussions are taking place, which you can do from this screen by clicking the Group Discussion Board link.


Once you’re finished checking on your student groups’ activity, remember to exit Student Preview to return to Instructor mode in your course.

Wednesday, September 21, 2022

Improving PowerPoint Presentations: Images

Contributed by Jane Nguyen, Instructional Designer I (CSE)

This is the third article in my series about improving PowerPoint presentations. As with many ed tech tools and pedagogical approaches, PowerPoint undeservedly catches a lot of flak, with people calling it “unimaginative,” “boring,” and “lazy.” What people often don’t realize is that the tool itself is amazing; it is the way people use it that is poor; they fail to engage when they don’t have sound knowledge of how to (or even if they should) place elements and in what quality and form. Personally, I can never get tired of talking about PowerPoint because it is a tool that I love, despite all the hate it gets.

So…let’s get back into it. I’ve previously talked a lot about text in PowerPoint, and now I want to focus on images.

Making images larger

The thing is…images are king. PowerPoint presenters don’t leverage them enough. People are very visual and nothing reels them in like a powerful image. So…even if you are already a person who includes images near text to convey your learning content, consider making the images bigger in relation to the text, especially if you are presenting your PowerPoint and it is not simply being posted to Blackboard or another LMS for learners to view and read.

Presenters and teachers are conditioned to believe that the words are the most important element on PowerPoint slides because…well, that’s the information. There’s some validity to that, but it is still the case that in terms of engagement, viewers are drawn into a powerful image and may listen to your words more attentively since you’ve caught their attention. The image being “powerful” has to do with the image itself, but also to do simply with how big you make it on the slide.

Look at the difference between these two slides and consider how one might be more captivating than the other. It’s a subtle effect, but…don’t be afraid to size up your images for greater engagement.


Of course, size decisions still depend on what you want for a given slide. There may be some slides where you want students to notice the text more than the image, at least initially (presumably you want them to notice both). In those cases, by all means make the text bigger. The point is, be intentional with where you want attention drawn, and size elements accordingly rather than rotely make everything the same size.

Avoid multiple images

Another image mistake to avoid is having too many photos on a single slide. The temptation to put four photos on one slide may be there sometimes, as you’ll feel “thorough” having many photos reinforcing your content. Two or three photos may be an acceptable max; when you get into four or five, you may be dividing the viewer’s attention too much, to the point that they are too distracted by various photos to listen to you (the speaker) or to even be able to focus on any one photo. A quality image or two should be good enough.

Maintain diversity in photos

When including images of people in your PowerPoints, be mindful of including people from many different backgrounds, in terms of race, ethnicity, disability status, body size, height, age, hair color, etc. It can be easy to inadvertently include only a narrow “type” of people in images, especially if one is drawing from free stock photos on the Internet, which for a while now have skewed toward very mainstream. Though this is changing and you will see stock photos that reflect more diversity, you may still end up having to be intentional about which photos you pick. The reality is that college students come in all body sizes, hair colors, ages, backgrounds, etc, Some are in wheelchairs, some are 40 rather than 18 or 20, some have hair with green highlights, some have tattoos. They are all students who should be represented even in learning content such as images in PowerPoints.

For more on images in PowerPoints, here is an excellent tip sheet:

A Guide to Using Images and Photos for PowerPoint.

Wednesday, September 14, 2022

Improving PowerPoint Presentations: More on Text

Contributed by Jane Nguyen, Instructional Designer I (CSE)

Last week I ended my article on improving PowerPoint presentations with the tip that you should not have too many words on a single slide. A rule of thumb is to have a maximum of 30 words per slide. Even if you have several paragraphs that you want to convey, and they are all related to the same idea or subject, break up the information over many slides rather than try to fit them into one or two slides.

At the same time, balance this with not going from slide to slide too frequently, which can be distracting to a listener. Generally, 1 to 2 minutes of talking per slide is a minimum that ensures you aren’t going “too fast.”

Furthermore, for presentation purposes (meaning you plan to deliver the presentation to students as opposed to the Power Point functioning as detailed notes for them), don’t put all the words on the slides anyway. Instead, keep them in Word document notes that are for you as you present. If you want, you can make your notes available to students afterward. The slide itself should only have keywords, phrases, or names (such as of a theory or concept) that help keep the listener focused as you present.

Another frequent inclusion on Power Point slides is bullet point lists. (The keywords, phrases, and names of concepts/theories mentioned above could be in bullet point lists.) It is recommended that you have no more than 6 bullet points per slide. Thus, if you have twelve bullet points, you’ll need at least two slides to present them.

Consider using the “animations” function in Power Point to have those bullet points appear one at a time instead of all at once. Words or phrases appearing to the audience as you talk about them can help to focus learners so that they are not “reading ahead” to your other topics as you try to talk about them and keep them focused on the current one.

To have bullet point items appear one at a time, just select all of the bullet point text items, go to “animations” in the toolbar/menu, and select an animation type. There are many. I tend to like “random bars,” but you can select from many others that are visually appealing but not distracting. As soon as you apply that animation to the items you’ve selected, you’ll see in a right-hand menu an ordering of the items: 1 through 6 or 1 through 5 (however many bullet point items you have). You can change the order of the items (and/or have an image appear with an item) as you see fit.

At the top, you have an option to choose what will make the item appear. Choose “on click.” This will make it such that your first bullet point won’t appear until you mouse-click, your 2nd bullet point won’t appear until you mouse-click again after that (after you’ve talked about your first item), and your 3rd bullet point won’t appear until you click after that (after you’ve talked about your 2nd item). And so on. It is a very nice touch to give your PowerPoint a true “in the moment” presentation feel.

A final text tip:

You may be tired of hearing this one, but it bears repeating. Provide good contrast between the text and the background. It’s hard to not want to choose favorite colors regardless of what is most readable. But readability is paramount. Place light text on a dark background or dark text on a light background.

Next week, I will talk about images and how to place them for optimal engagement. Until then, check out this short write-up that offers yet more Power Point recommendations: Top 10 PowerPoint Tips to Make Your Slides More Effective.

At-Risk Students and Blackboard Retention Measures

Contributed by Henry Newkirk, Instructional Designer II (HSH)

Many instructors have heard the term “at-risk student,” but may still wonder what does that mean, and why would Blackboard provide a Retention Center specifically to support at-risk students? At-risk student is a term used to describe students with a higher probability of failing your course. There are many reasons why students are identified as at risk, including individual and family factors. For more information about at-risk college students, we recommend Joann Horton’s 2015 paper, Identifying At-Risk Factors That Affect College.


This newsletter article will focus on how instructors can use the Blackboard Retention Center to monitor the level of engagement of all students to identify potential academically at-risk students in their courses. At most institutions, the risk is calculated from the probability of students achieving a passing grade of C or higher in the course. Those that are at increased risk have a low likelihood of earning a passing grade. A recent Blackboard press release indicated some profound points. According to a Blackboard survey of at-risk students and students of color, “nearly 80% of students considering discontinuing their studies believed their institution can do more to keep them enrolled.” The survey also revealed that 48% of students of the students at risk of not returning to school were not satisfied with the level of support received during COVID.

At the University of Houston – Clear Lake, UHCL, we know that instructors already go above and beyond to provide academic support links in their Blackboard shells, and guide students to the different resources when they need help. You may be wondering how you can extend this support with the limited time you have available while juggling the many demands as faculty.

The Blackboard Retention Center (BRC) provides an easy way to discover which students in your course are academically at risk and allows you to communicate with them to help them take immediate action for improvement. With this tool, instructors can focus attention on students who need it the most to succeed in their classes. With Blackboard’s Retention Center, helping your students is easy as checking your email.


Blackboard Retention Center (BRC)


The tool provides a colored bar display of a table with pop-up information. There are (4) categories in that your course records information about student engagement within the course.
  • Missed Deadlines
  • Grades
  • Course Activity
  • Course Access
Instructors can instantly monitor and notify students with one click (email) of available resources. Another great feature of this tool is that instructors can add these private notes about an individual student:
  • Remedial activities or accelerated materials offered
  • Special accommodations for disabilities or language barriers
  • One-on-one meetings
  • Extra attempts allowed on assignments or tests
  • Who is assigned to help the student
  • Possible teaching assistant or student mentor opportunities

Course Activity - Zooming in on What You Do

Monitoring activity in your course is an essential aspect of how you can help your student at risk of failing. The course activity section provides the instructor with a one-stop view of the course activities, engagement, and participation history of the instructor.

If you would like to learn more about the Retention Center and how it can help you, IDT’s instructional designers can assist via individualized consultation sessions. To take advantage of our services, contact the Support Center at SupportCenter@uhcl.edu or via telephone at (281) 283-2828. The Support Center staff will create a help ticket for you that will be assigned to a member of our IDT team, who will then contact you to schedule a consultation.

Recommendations for Student Submissions of Video Presentations and Other Large Files in Blackboard

Contributed by Jenni Willis-Opalenik, Ph.D., Director - Technology Learning Services

Submissions of video presentation and other large files (especially those exceeding 100MB) in Blackboard can often present challenges for users arising from several external (non-Blackboard) causes, including the user’s ISP, user-side bandwidth issues, and user-side slow internet speeds. This article will present two options for faculty and students that can alleviate such problems.

Large File Submissions Via OneDrive Share Links

Because all UHCL students have access to O365 (including OneDrive) both on and off campus, they can save their large files in their UHCL OneDrive. To submit their large files in Blackboard, students can use the Share feature on their OneDrive file and present their work as a clickable hyperlink. Instructors can click that link in the student’s Blackboard submission to access and download the student’s file from OneDrive. For more information, please refer to our team's support document Submitting Large Files in Blackboard Via OneDrive Links.

Student Video Submissions from Echo360 to Blackboard

Students can use Echo360 Universal Capture: Personal to create video presentations and save them in their Echo360 Library. They can then submit their video as a hyperlink in a Blackboard assignment drop box, discussion, or another area in a course. Our team has created a short “crash course” video, Student Presentations Using Echo360, for students on all of these Echo360 topics.

Faculty who would like to learn more about either or both options should contact the Support Center at SupportCenter@uhcl.edu or via telephone at (281) 283-2828. The Support Center staff will create a help ticket for you that will be assigned to a member of our IDT team, who will then contact you to schedule a consultation.

AI Tools and Their Effect on Higher Education

Contributed by Izaak Diefenbach, Instructional Designer I (COE)

In recent years, there has been an increase in the use of artificial intelligence (AI) in higher education. This is due to the many benefits that AI can offer to both students and educators. Some of the ways in which AI is being used in higher education include:
  1. Online learning: AI can be used to create personalized learning experiences for students. For example, the edX platform uses AI to provide students with customized recommendations for further study based on their previous performance.
  2. Assessment: AI can be used to automate the grading of student essays and other assignments. This can save educators a significant amount of time and allow them to provide more detailed feedback to students.
  3. Research: AI can be used to help researchers identify relevant papers, find new patterns, and make predictions. For example, the Google Scholar search engine uses AI to rank search results by relevance.
  4. Administration: AI can be used to automate administrative tasks such as scheduling and emailing. This can free up time for educators so that they can focus on more important tasks. Overall, the use of AI in higher education can provide many benefits to both students and educators. It can help to improve learning outcomes, save time, and make the overall educational process more efficient.
Before I go any further, I have to make an admission: this is the first sentence I wrote for this article. Everything above was written by an AI tool called GPT-3, part of the OpenAI project, a set of open-source tools that allow users to build AI applications. To generate the text, I set a few parameters in the tool and entered an eleven-word prompt: “Write an article on the use of AI in higher education.” Once I clicked submit, I had about 250 words in just a few seconds. I could have generated a much longer paper with just a few clicks.

In a recent Chronicle of Higher Education article titled “Will Artificial Intelligence Kill College Writing?” Jeff Schatten discusses the effect AI tools such as GPT-3 will have on higher education and what it will mean for the future. At present, the tools are good, but not great. On some topics, GPT-3 can generate a pretty good paper, but others give questionable results. However, results are improving at a very fast rate.

One immediate concern for many instructors will be that these tools generate original writing; they are not plagiarizing from other sources, meaning that anti-plagiarism tools cannot detect an AI-generated paper. Another concern is that these tools are available at almost no cost to users, making them accessible to most students.

The initial reaction to this will be to panic. If we can’t detect when students are turning in work they didn’t actually do, how do we assess their work? In the end, as with all technological advances, it will mean a change of approach in how we teach students. Instead of saying, “How can we fight this?” we need to ask, “How can we use this?” That’s where innovation will be essential. AI is just a tool. How can we use that tool to enhance instruction and better serve our students? This is just one of the areas the Instructional Design and Technology team is following so we can help our instructors help our students.