Contributed by Jenni Willis-Opalenik, Ph.D., Director - OIT Technology Learning Services
This week, we're going back in time. Ah, life before the pandemic! Our recommendation this time is a 2019 podcast featuring Flower Darby. During the show, she discusses her then-new book, Small Teaching Online. Please use the hyperlink in the reference below to access this episode from Teaching in Higher Ed's podcast series.
Stachowiak, B. (Host). (2019, January 17). Small teaching online (No. 240) [Audio podcast episode]. Teaching in Higher Ed. https://teachinginhighered.com/podcast/small-teaching-online/
Monday, March 28, 2022
Learning to Learn - Active Learning Resources for Faculty
Contributed by Jenni Willis-Opalenik, Ph.D., Director - OIT Technology Learning Services
Are you interested in information that may help your students learn more effectively? If so, the following new resources offer some techniques that you may want to incorporate into your start-of-semester or course orientation activities and lessons. They also support and extend the IDT team's recent training sessions and newsletter articles about active learning techniques in higher education.
Are you interested in information that may help your students learn more effectively? If so, the following new resources offer some techniques that you may want to incorporate into your start-of-semester or course orientation activities and lessons. They also support and extend the IDT team's recent training sessions and newsletter articles about active learning techniques in higher education.
- Video: Learning to Learn [8:22] - provided by the American Institute of Certified Public Accountants, this short video features an interview with Ulrich Boser, the author of Learn Better.
- Online Article: Boser, U. (2018 May 2). Learning is a learned behavior. Here's how to get better at it. Harvard Business Review. Retrieved from https://hbr.org/2018/05/learning-is-a-learned-behavior-heres-how-to-get-better-at-it
Monday, March 21, 2022
Has a Current Merged Blackboard Course Disappeared?
Contributed by Samantha Houston - Learning Technology Administrator I
Did your merged course disappear from your course list in Blackboard? We see this behavior in Blackboard if one of your child course sections contains no active student users. The two leading causes of course sections without active users are:
If you have any questions about the above information, please feel free to contact the Support Center at either 281-283-2828 or supportcenter@uhcl.edu, and a member of our team will be in touch to assist.
Did your merged course disappear from your course list in Blackboard? We see this behavior in Blackboard if one of your child course sections contains no active student users. The two leading causes of course sections without active users are:
- All previously enrolled student(s) dropped the course; or
- The class is canceled, thereby deactivating all student users.
If you have any questions about the above information, please feel free to contact the Support Center at either 281-283-2828 or supportcenter@uhcl.edu, and a member of our team will be in touch to assist.
Partial Credit and Negative Scoring on Tests & Quizzes in Blackboard
Contributed by Jane Nguyen - Instructional Designer I (CSE)
Many instructors give periodic quizzes or tests in their Blackboard courses. This is a fairly simple assessment to deploy. It’s also very convenient in terms of grading, as multiple-choice questions can be auto-graded.
It is not the creation of a test or quiz but the various settings that can become tricky. This week I’d like to discuss a common question type and how partial credit and negative scoring can be applied.
Multiple choice questions in which there is only one correct answer are probably the most common question type. However, multiple answer questions are often used too and are a good way to mix it up for your students. This means a question is asked, and out of answer choices A, B, C, D, and E…A, B, & E may all be correct while C and D are incorrect.
If you use this question type, you may want to score the question in an “all or nothing” way, meaning…only if the student answers A, B, and E (nothing more, nothing less) will credit be given.
Just as often, however, instructors want to give partial credit, such that if the student chooses A & B but not E, they will still be given 2/3 credit since they got 2/3 of the correct answer. Or, if they choose A, B, and E (all correct answers), but also choose a wrong answer—C and/or D—they get full credit for getting all the right answers, but they’re also penalized for choosing a wrong answer, and they end up with partial credit for the whole question. Having students get “dinged” for a wrong answer in a multiple answer question prevents them from intentionally marking all the answers in hopes of getting full credit, since in marking everything they will have certainly marked whichever answers are correct.
Blackboard also has a way to prevent students from getting a negative score for a given question if they were to mark only one right answer and three wrong answers (too many negative scores combined with only one positive score).
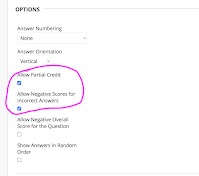
Here is how you would set all this up. When you are editing a Multiple Answer question, under Options in the test settings, check the box for “Allow Partial Credit.” Also check the box for “Allow Negative Scores for Incorrect Answers.” Leave unchecked the box “Allow Negative Overall Score for the Question.” (This is what ensures a floor-score of “0” rather than a negative number).


Many instructors give periodic quizzes or tests in their Blackboard courses. This is a fairly simple assessment to deploy. It’s also very convenient in terms of grading, as multiple-choice questions can be auto-graded.
It is not the creation of a test or quiz but the various settings that can become tricky. This week I’d like to discuss a common question type and how partial credit and negative scoring can be applied.
Multiple choice questions in which there is only one correct answer are probably the most common question type. However, multiple answer questions are often used too and are a good way to mix it up for your students. This means a question is asked, and out of answer choices A, B, C, D, and E…A, B, & E may all be correct while C and D are incorrect.
If you use this question type, you may want to score the question in an “all or nothing” way, meaning…only if the student answers A, B, and E (nothing more, nothing less) will credit be given.
Just as often, however, instructors want to give partial credit, such that if the student chooses A & B but not E, they will still be given 2/3 credit since they got 2/3 of the correct answer. Or, if they choose A, B, and E (all correct answers), but also choose a wrong answer—C and/or D—they get full credit for getting all the right answers, but they’re also penalized for choosing a wrong answer, and they end up with partial credit for the whole question. Having students get “dinged” for a wrong answer in a multiple answer question prevents them from intentionally marking all the answers in hopes of getting full credit, since in marking everything they will have certainly marked whichever answers are correct.
Blackboard also has a way to prevent students from getting a negative score for a given question if they were to mark only one right answer and three wrong answers (too many negative scores combined with only one positive score).
Here is how you would set all this up. When you are editing a Multiple Answer question, under Options in the test settings, check the box for “Allow Partial Credit.” Also check the box for “Allow Negative Scores for Incorrect Answers.” Leave unchecked the box “Allow Negative Overall Score for the Question.” (This is what ensures a floor-score of “0” rather than a negative number).

Under the answer choices, you will see an entry field that says “Partial Credit.” It is here you can enter how much credit students should get for choosing that answer. The question overall may be worth 20 points. But if choices A and B are correct and the student only answers A, you would not want them to get full credit, but partial credit. In the image example, I entered partial credit at 50% for answer A and 50% for answer B. If you have three correct answers rather than two, you would have them worth 33.333% each (to add up to 100% or full credit).

When it comes to “negative credit” for students choosing wrong answer choices, you would do the same thing, only put the partial credit as negative credit. You would enter “-20%” in the partial credit entry field to indicate that if a student chooses that answer, they lose 20%. This means that even if they got the two correct answers (A & B) and got full credit for them, they’d lose 20% off that and end up with 80% credit on that question.

Keep in mind that credit taken off for wrong answers can be as large or as small as you want. You may want to give your students a lot of credit for getting the correct answers with less penalty for wrong answers (but still a penalty so that it’s not in their interest to “guess check” everything). Specifics are up to you.
The partial credit/negative credit allowances can be a little tricky at first, but ultimately can be set up in a way that is fair to your students and simple for you. If you’re interested in these test settings and would like some help, don’t hesitate to reach out to an instructional designer. We are happy to help.
Blackboard Tech Tip: Course Messages
Contributed by Henry Newkirk, Instructional Designer II (HSH)
As many instructors know, Blackboard provides two similar communication tools often described as "email" -- the Course Messages tool and the Email tool. For a quick refresher about these two communication tools, we recommend you review our team's support document, "Using Blackboard Email." That handout provides a side-by-side comparison of the Course Messages and Email options.
In this week's Blackboard Tech Tip, I'll turn our attention to the Course Messages tool. What is the Course Messages tool, and what are its benefits to students and instructors?

How, when, and why would I use Course Messages in my Blackboard class? Instructors often use Course Messages to provide a secondary (and private) communication channel between you and your individual students. In addition to whole-class communication via Announcements, Discussions, etc., encourage students to communicate privately with you about the questions/concerns while maintaining a record of that communication within the Blackboard course.
How do I create a link to the Course Messages tool within each Blackboard course? If you don't have a Course Messages link on your course menu, follow these easy steps to add one:
As many instructors know, Blackboard provides two similar communication tools often described as "email" -- the Course Messages tool and the Email tool. For a quick refresher about these two communication tools, we recommend you review our team's support document, "Using Blackboard Email." That handout provides a side-by-side comparison of the Course Messages and Email options.
In this week's Blackboard Tech Tip, I'll turn our attention to the Course Messages tool. What is the Course Messages tool, and what are its benefits to students and instructors?
- Instructors may opt to use the Course Messages tool to store all course-related communication within the Blackboard courses, providing an accurate and readily retrievable accounting of faculty-student messages.
- Maintaining course communications in Course Messages helps both students and instructors from dealing with additional messages in the UHCL (or other) email inbox.
- Another advantage is that the Course Messages tool can be accessed from within specific courses (if instructors have made it available) AND from the Blackboard Global menu, as shown in the screen capture accompanying this article. Global menu access enables both instructors and students to identify messages waiting for them in any of their courses upon logging in to Blackboard.

How do I create a link to the Course Messages tool within each Blackboard course? If you don't have a Course Messages link on your course menu, follow these easy steps to add one:
- Navigate to the top of your course menu, roll over the Add Menu Item icon (plus sign within a circle), and select the Tool Link option from the drop-down menu.
- Enter a name for the Course Messages tool link on the Add Tool Link box.
- Select the Course Messages option from the drop-down menu in the Type field.
- Check the box next to "Available to Users" and click the Submit button.
Your new link will appear at the bottom of your course menu. You can use drag-and-drop or the Keyboard Accessible Reordering link to change the link's position within the menu.
For a quick overview of how the Course Messages tool works in Blackboard's original course view shells (the format used in UHCL's current cloud-based system), please watch Blackboard's video Course Messages in the Original Course View. You may also find the newer Blackboard video Messages in Blackboard Learn with the Ultra Experience of value. UHCL's Blackboard system uses Blackboard Ultra base navigation, which provides the Messages option on the Blackboard landing page when you log in but haven't yet entered a specific course (as seen in the first 15 seconds of the video). For information provided in the rest of the video, you can ignore information regarding course shells that use the Ultra experience.
TIP: If you use the What's New module as an entry page, you will be notified when you log into the course when there is a new message.
For more information about Course Messages or any other Blackboard tool, please contact OIT's Support Center. A member of the Support Center staff will create a help ticket and assign it to the IDT team, and a member of our team will get back to you as soon as possible (typically within two business days).
Monday, March 14, 2022
What Happened to the Blackboard Login Page?
With the transfer of Blackboard access as part of the new GoUHCL (QuickLaunch) portal, you may have noticed that we no longer use our custom Blackboard login page. The Support Resources that had been located on the Blackboard login page are not gone. We have simply moved them within Blackboard. You can find them on the Institution Page, shown in the image below.

To see a quick demonstration of how to access the support resources, please watch the IDT team’s new video, Crash Course - Blackboard Resources [2:08].
If you have any questions about Blackboard online support Resources, please contact the OIT Support Center at 281-283-2828 or SupportCenter@uhcl.edu.
If you have any questions about Blackboard online support Resources, please contact the OIT Support Center at 281-283-2828 or SupportCenter@uhcl.edu.
Announcing the Arrival of GoUHCL (QuickLaunch)
The Office of Information Technology (OIT) is proud to announce the successful launch of GoUHCL (QuickLaunch) earlier today, Monday, March 14, 2022. GoUHCL is a cloud-based Identity & Access Management (IAM) solution that will provide the following key services to UHCL students, faculty and staff:
- Single Sign-On - One Portal for UHCL students, faculty and staff to access UHCL-Wide Applications such as Blackboard, Zoom, Taleo, Microsoft 365, and Echo360.
- Password Manager with Multi-Factor Authentication (MFA) - One Portal for UHCL students, faculty and staff to securely reset lost or forgotten passwords with multi-factor authentication (MFA).
Please refer to our initial support document, Accessing and Using GoUHCL (QuickLaunch), for information on how to access and use GoUHCL.
For more information regarding the GoUHCL, please contact the OIT Support Center at 281-283-2828 or supportcenter@uhcl.edu.
Post-Blackboard Outage Reminder: Manually Added Users (March 2022)
Contributed by Jenn Ray - Learning Technology Administrator I
As most of you are probably already aware of, we had a brief Blackboard outage on the afternoon of Monday, March 7. While most users’ access was restored by 6:00pm that same day, some users may remain affected.
Any user that was manually added to a course may still be unable to view that course. These users include:
Course Rubric (Ex. MATH1234.01)
NOTE: We have had a large number of requests already from some Instructors and from TAs reaching out about lost access. We can only assist TAs if the request to have them reactivated comes from the instructor of record for the course. Check your user list in your course to see if the user in question is available by going to Control Panel > Users and Groups > Users. Then, on the list look for the row for the user in question and check that they have the correct role in the course and that their Availability is set to “Yes”. If there are any changes that need to be made to availability and/or role, the information above can then be sent to SupportCenter@uhcl.edu.
As most of you are probably already aware of, we had a brief Blackboard outage on the afternoon of Monday, March 7. While most users’ access was restored by 6:00pm that same day, some users may remain affected.
Any user that was manually added to a course may still be unable to view that course. These users include:
- Teaching Assistants
- Embedded Tutors/Librarians
- Audit Students
- Students Resolving Incompletes
- Additional Instructors who are not Instructor of Record
Course Rubric (Ex. MATH1234.01)
- The affected user’s name
- The affected user’s username
- The role that user held within the course (Student, TA, UHCL_ACCESS – which is a copy of the Instructor role for additional, non-instructor-of-record Instructors)
NOTE: We have had a large number of requests already from some Instructors and from TAs reaching out about lost access. We can only assist TAs if the request to have them reactivated comes from the instructor of record for the course. Check your user list in your course to see if the user in question is available by going to Control Panel > Users and Groups > Users. Then, on the list look for the row for the user in question and check that they have the correct role in the course and that their Availability is set to “Yes”. If there are any changes that need to be made to availability and/or role, the information above can then be sent to SupportCenter@uhcl.edu.
Creating Topics in Your Echo360 Course Section
Contributed by Jane Nguyen, Instructional Designer I (CSE)
In a recent article, Jenni discussed Echo360’s “collections” function which allows you to organize videos in your library, a repository that may become gargantuan and without rhyme or reason unless structured with appropriate labeling.
This week I want to expound on another organization tip, though not of your entire Echo360 library; instead, of videos, presentations & materials for a single course. As you may be aware, anytime you activate Echo360 in one of your Blackboard shells, a separate space is created in your Echo360 dashboard just for that course and is labeled with that course’s section #, term, etc. This way, when your students navigate to or are given links to view videos, they see only those that are relevant to the course they are taking, not the instructor’s entire video repertoire.
The problem is that you may have a lot of videos even within a single course, and organization is needed there too. You may wish to have collapsible topics rather than a long, seemingly never-ending litany of content. This makes a lot of sense, as the sheer volume of videos, even if labeled clearly, could become overwhelming to you and your students alike if some of it is not collapsed.
A solution is to create topics and place within each topic whatever videos, PowerPoint slides, or other materials go with that topic. On the screen, the students would see the materials under the topic, but they are also contained within the topic. Users (either you or your students) can toggle on the topic to, as needed, collapse the related video list out of view and un-collapse it back in view. Doing this imitates a LinkedIn Learning style navigation, which many people find visually appealing and easy to use.
Here’s what you should do for the desired effect. Once you are logged into the main screen of your Echo360 account, you should see these items on the top menu: Library, Courses, Collections, and Create (the latter is in blue). Click on Courses. Then, choose the course you want to organize.
Once you are in the course you want to organize the content for, notice the two blue buttons on the top right: New Class Group and New Class.
- New Class Group is what you will click to create a topic, which Echo360 describes as: “a container to group classes/lessons in Echo360. These groups are designed to allow instructors or teaching assistants to organize lectures with similar subject matter, or to group several pieces of media (contained in classes) together that pertain to a single topic.”
- New Class can be kind of confusing in that it actually means a single lesson, lecture video, presentation, or material. It is not a whole course.
So, to create a topic, click on New Class Group and call the topic whatever you want to (it could be something like “Lesson 1: Emerging Technologies” [or whatever is appropriate to your course). Contained in that topic (and appearing under it) would be videos, presentations, and materials related to Emerging Technologies. As mentioned previously, New Class refers to the actual videos, presentations, and materials that you add.
What is described above is your starting point. I would recommend watching this short how-to video for a few additional steps that are better demonstrated visually than described in written words: Creating Collapsible Topics in a Course Section of Echo360. In the end, you will have organized your content for a single course in a way that lets your students review material quickly and efficiently in the “LinkedIn Learning” format that many people find intuitive and convenient.
If you have any questions, please do not hesitate to reach out to a member of the IDT team. We are happy to assist.
Monday, March 7, 2022
Vendor Update: Marching Through Midterms with ProctorU!
As we progress through the Spring semester, we hope Midterms are going well. To support you and your students, here are two helpful tools.
- ProctorU 202 is an elevated instructor training designed to empower you to use the entirety of your ProctorU account.
- MythBusters addresses common misconceptions students have about online proctoring.
For more information about ProctorU, or the university's other online proctoring service, Respondus LockDown Browser and Monitor, visit our Online Proctoring resources web page or contact the Support Center.
Student Video Submissions from Echo360 to Blackboard
Contributed by Sam Houston - Learning Technology Administrator
If you will be having students submit videos as graded assignments, we recommend having them first upload their videos to their Echo360 libraries, then submit a link to their video assignment in Blackboard, instead of directly uploading those videos into your courses. Having students upload links instead of video files keeps your course file size small, so that your course continues to get backed up.
As reported in our March 29, 2021 newsletter, your students can upload their own video projects into Echo360 and then submit a hyperlink to their video in an assignment dropbox, discussion, or other Blackboard tools for review and grading.
Even if you don't use Echo360 to create and store videos, you may still enable students to access Echo360 in your course for these types of activities. Simply add an Echo360 link to your Course Menu and let them know that it's there for them to use for video submissions. Adding this link to your course menu also enables your students to create their own Echo360 accounts.
A "how-to" document for students has been created to assist with adding saved mp4 files to an Echo360 library, so feel free to share this with your students.
Since students can also have licensed Zoom accounts, they can create recordings for assignments using Zoom that can be automatically uploaded into their Echo360 libraries. Students who are unsure about the type of Zoom account they have will need to email the Support Center to request a Zoom licensed account. Once a student has a licensed Zoom account, they should be able to record their videos to the cloud by following these steps:
- Log in to https://uhcl.zoom.us/ with your UHCL credentials.
- Click "Meetings" in the menu on the left.
- Click Schedule a meeting.
- When choosing the settings for the Zoom meeting(s), make sure to select the option to record to the cloud. By doing so, any Zoom meetings you record to the cloud will automatically be uploaded into the Echo360 library.
- Once the Zoom recordings have been uploaded to the Echo360 library, follow the instructions in the "how-to" document starting with step 7. (Click on the thumbnail for the video that was uploaded) to submit the recording in Blackboard.
For more information about recording and saving a presentation in Zoom, visit the new Zoom Learning Center to enroll in and complete the short course, Record Your Meeting or Webinar. When prompted to enter your email and password, use your UHCL computer account credentials.
For information about the Echo360-related steps, refer to our support document, Submitting Video Assignments in Blackboard Via Echo360.
If your students find that they are unable to record to the cloud or if they have any questions, please have them contact the Support Center (supportcenter@uhcl.edu).
Blackboard Tip: Using Teaching Style Customization Options
Contributed by Izaak Diefenbach, Instructional Designer I (COE)
Today, I will look at a part of the Blackboard Course Management menu that many of you may not even know is there. The Course Management menu is the lower half of the Blackboard Course Menu, the dark gray area on the left side of your Blackboard course. The Course Menu is only visible to instructors and includes commonly used sub-menus like Course Tools, Users and Groups, and Grade Center. Below those sub-menus, however, is one called Customization, and within that sub-menu is another sub-menu called Teaching Style.
The Teaching Style sub-menu contains four tools that can help you organize and build your course to reflect your teaching style and help make it your own. The first tool is Select Course Structure. The Select Course Structure tool allows you to choose a basic organizational structure for your course based on five focus areas. The five focus areas are Activity, Communication, Content, Systems, and Time. Each focus area provides several different menu organization options that will create a basic menu structure and a selection of content areas and tools designed to reflect a specific teaching style. For example, the Focus on Activity section features options such as Case Study, Constructivism, and Experiential learning, while the Focus on Communication section features choices such as Cooperative Learning and Guided Discussion. If you are not sure which one you might want to choose, you can click on any of the options to get a description and preview of the menu style. If you find one you like, click the Use This Structure button to organize your course in that style. IMPORTANT! If you apply a new Teaching Style (Course Structure) to a course with an existing menu structure, you can only restore the menu to its previous design by manually deleting each of the new menu items added when you applied the new Teaching Style.
For more information about the Teaching Style (Course Structures) option, please refer to either of the following resources:
The second tool is Select Course Entry Point. This tool allows you to select the first page users will see when they open the course. All you have to do is click the drop-down menu and select the page you would like to use for your entry point.
The third tool is Default Content View. This tool allows you to decide whether you would like each content item or area in your course to be represented by just an icon for the type of content, such as a file folder for a Content Folder or a file page for an individual Content Item, just the text title you gave the item or area, or both an icon and the text title. Blackboard automatically defaults to both, but you can change if you prefer. There is also a checkbox that will also allow you to apply the change to all of the existing content in the course.
The last tool is Select Banner. This tool allows you to select an image to serve as a banner at the top of the course’s Entry Point. You can choose any image you have saved to your local files, but Blackboard recommends a size of approximately 480 x 80 pixels to avoid cropping the image in some browser windows. The tool also allows you to add alt text to your banner image for accessibility.
Finally, don’t worry if you change your mind about any of these options. There is still a Cancel button in the bottom right corner of the screen. The changes won’t be finalized until you click the Submit button to the right of the Cancel button. If you have any questions about using any of the Teaching Style tools or are unsure which Course Structure would be best for your course, please consult your designated Instructional Designer.
Subscribe to:
Posts (Atom)